Steaming hot crescent moons, an aromatic mixture of juicy pork, cabbage and garlic chives encased within a chewy skin, fried on one side until shatteringly crisp and served with a slightly sour dipping sauce. Gyoza have become an integral and hugely popular part of nearly every ramenya’s menu, finding their place as an almost essential accompaniment to the deep, nourishing bowls of noodles. When cooked poorly they can drag down a memorable dish of ramen, but if cooked well, with consideration and care, they have the power to raise a lacklustre meal to giddy heights, providing a contrasting texture to the silky noodles and soothing broth. High quality frozen gyoza wrappers are available in most oriental supermarkets these days, meaning that home-made dumplings are more achievable than ever before, and while the filling and pleating of the little parcels can take a while to get used to, there’s a huge amount of satisfaction to be had when you gaze upon a tray of your handiwork.
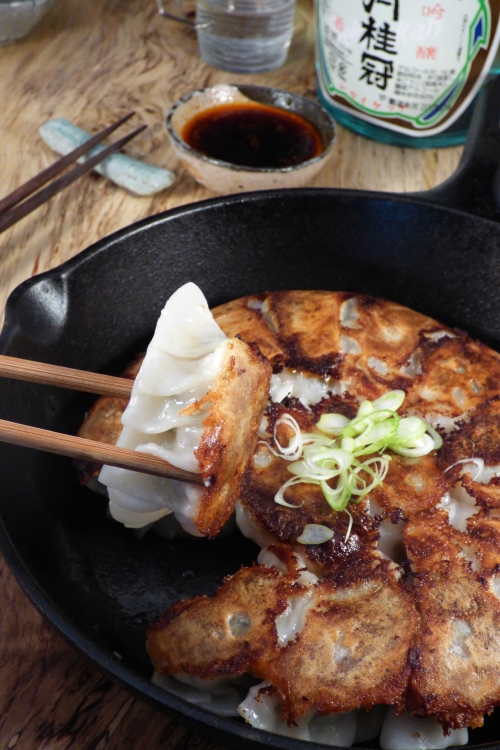
Hanetsuki gyoza are a recent variation of these classic pot-stickers, where a number of plump, steamed dumplings are fused together in a hot pan with a thin mixture of flour and water. This batter crisps and darkens to form lacey skirts or wings (hane) around the edges of each dumpling, creating more surface area for crunchy, brittle bubbles to form and when placed in the middle of the table, it makes a fantastic tear-and-share style dish, perfect for relaxed dining with friends.
Dipping sauce ingredients.
- 3 tablespoons soy sauce
- 3 tablespoons rice vinegar
- A few drops of rayu chilli oil or sesame oil
- Simply mix the soy sauce and rice vinegar together, then season to taste with rayu or sesame oil. Pour the sauce into a small bowl to serve with the gyoza and set aside.
Gyoza ingredients.
- 450g minced pork shoulder
- 450g Chinese cabbage
- 100g garlic chives, finely chopped
- 1 tablespoon grated ginger
- 2 cloves garlic, finely chopped
- 1 teaspoon ground white pepper
- 2 teaspoons caster sugar
- 1 teaspoon sesame oil
- 5 teaspoons fine sea salt
- 1 pack gyoza skins (there’s normally around 50 skins to a pack)
- vegetable oil for frying
- 1/2 teaspoon rice flour
- Start by finely mincing the Chinese cabbage, then place in a large bowl and sprinkle two teaspoons of the salt over. Toss the cabbage to make sure it is well coated with salt, then set aside for fifteen minutes- the salt will draw excess water from the cabbage, preventing the gyoza filling from becoming too soggy.
- Add the minced pork to the bowl of a stand mixer with beater attachment, and add the chopped garlic, grated ginger and the garlic chives, then sprinkle in the ground white pepper, sugar and remaining three teaspoons of salt. Take the salted cabbage and put it in a clean cloth or tea towel, squeeze hard over the sink to get rid of all the water from it, then put it in the mixer with the pork. Finally add in the sesame oil and set the mixer to beat the seasoned pork for around three to four minutes, or until the flavouring ingredients are well incorporated and the meat has started to become sticky and malleable. Obviously you can also do this step manually if you prefer- just add the aromatic herbs and seasonings to the pork in a large bowl and knead by hand until the meat and vegetables have become a soft ‘dough’.
- Next, set up your kitchen counter for production-line gyoza filling. You’ll need a small bowl of water to seal the edges of the dumplings, a cloth or hand towel to keep your fingers clean, clingfilm to cover the opened pack of wrappers to stop them drying out too much, and a lined baking sheet to lay your finished gyoza on.
- To fill your gyoza, lay a wrapper on the palm of your hand, then take a teaspoonful of the pork filling and place it in the centre of the wrapper. Dip a finger in the bowl of water and wet the edge of one half of the gyoza skin, then fold this dampened side of the wrapper over the filling to the dry half. Pleat the moistened edge of the wrapper only, pressing it firmly to the dry half and pinching to seal. Put the dumpling down on your work surface to flatten the bottom, then form it into a crescent shape- the pleating of the wrapper causes it to curve naturally, but it’s good to give the gyoza a little primping after you’ve sealed them, to make sure they’re attractive and look appetizing. Place the dumpling on a baking sheet and cover with cling film to stop the wrapper drying out and cracking, then repeat the filling process until all of your wrappers are used up.
- This recipe makes far too many gyoza to use in one go, but the finished gyoza freeze very well and cook from frozen, meaning you can make a full batch in advance and use them as you need. Place the gyoza on a baking sheet lined with greaseproof paper- making sure they aren’t touching anywhere- then freeze for an hour uncovered. You can now remove them from the sheet and put in a bag or container in the freezer, where they should store for several months.
- To cook the gyoza, put two tablespoons of vegetable oil into a small, 20cm frying pan over a medium heat. Fill the pan with your gyoza, packing them closely together in a single layer (this will take approximately 15 gyoza) then pour 250ml of boiling water over and place a lid on the pan. Cook the dumplings until the water has mostly evaporated (this normally takes around five minutes) then remove the lid- the liquid that is left in the pan should appear fairly thick and starchy.
- Mix the rice flour with two tablespoons of hot water, then drizzle this evenly over the gyoza in the pan and continue to cook without stirring until the starchy liquid has all dried up and started to form a thin crisp pancake at the edges. Keep an eye on the colour at the edges of the pancake- it should go a deep golden brown, but carry on cooking for another few minutes to make sure the ‘wings’ of the gyoza are firm enough to be able to turn out in a complete cake. When the gyoza are crisp underneath, slide the pan of dumplings onto a plate, then invert to serve them crispy-side up.
Each pan of hanetsuki gyoza serves 3-4 people as a side dish.

I’ve seen these before, but I didn’t know what they were called! I love gyoza! I’ll see if I can find a restaurant nearby that serves hanetsuki gyoza 😀
LikeLike
They’re named after a traditional game similar to badminton, I guess because the frilly, lacey parts look similar to the feathers on a shuttlecock. They’re well worth hunting down if you get a chance, much crunchier and crisper than regular gyoza 🙂
LikeLike
Never seen this before, but looks quite intriguing how they are cooked together. Have to try it out, like the idea of more crispy-ness 🙂
LikeLiked by 1 person